Underwater Photography
EquipmentUnderwater photography is one area where you definitely need special equipment, and special techniques to go with them. There are two main solutions to the problem of taking a camera underwater: dedicated underwater cameras, and housings which keep regular above water cameras from getting wet. For some years most professional underwater photographers used dedicated underwater cameras as their primary means of doing underwater photography. Although several systems exist, including cameras by companies like Sea and Sea with their Motor Marine line of cameras, the market was dominated by a division of Nikon called Nikonos, and by one camera in particular, the Nikonos V. |
Dedicated Underwater Cameras
The Nikonos V is a strange candidate to be the world's premier underwater camera. It's a manual camera - a seriously manual camera. It's not a single lens reflex (SLR) camera or a rangefinder camera, it's more like a point-and-shoot camera where the scene through the viewfinder only corresponds roughly with what will appear in the final shot. Furthermore, this is a point-and-shoot camera which must be focussed manually without any mechanical, electronic or optical aids! The lens has two knobs on its side, one of which selects the aperture, and one of which selects the distance between the camera and the subject. Before taking a shot you must mentally estimate the distance between yourself and the subject of your photo, and then dial this into the lens before pressing the shutter release. After taking a shot the film must then be advanced manually! The only advanced, non-manual feature of the Nikonos V is its through-the-lens (TTL) metering of flash, meaning that it actually measures the amount of light reaching the film as the exposure happens, and automatically turns off the flash after it determines that enough illumination has been generated. This is a major help in achieving correct exposure. Nowadays, it seems as if the dedicated underwater camera market has split into two separate markets, one with a bright future and the other with a rapidly approaching dead end. Although the Nikonos V was the favored camera of professional underwater photographers from the time it was introduced in 1984, the following years saw a drift away in other directions. In particular, the advent of auto-focus cameras in housings allowed people to take photographs which were simply out of reach of the Nikonos. This was particularly apparent in the area of macro photography, where the Nikonos approach was particularly cumbersome and ineffective. Nikon responded with its $US8000 Nikonos RS, a very attractive dedicated auto-focus underwater camera released in 1992. This produced photos every bit as good as housed cameras, and the inherent smallness of dedicated cameras compared to housed cameras was also a signficant advantage, allowing easier handling of the camera underwater. However, the market for this camera was too small, it was plagued with flooding problems and in 1996 production ceased. Then in September of 2001 Nikon announced that they were also discontinuing production of the Nikonos V. The other market has a much brighter future: disposable one-time-use underwater cameras for completely amateur holiday snapshots. Don't be deceived - these cameras are strictly low-end affairs, often with no flash, or only a feeble on-camera flash with all of the problems that implies. Someone who wants more than just poor quality reminders of what they saw will soon be disappointed with these cameras, but they're extremely cheap and maintenance free, making them a good entry point for someone who isn't sure whether or not they want to dive deeper into this hobby (ha, ha). Although they are very limited, the economic reality is that these cameras will be around as long as film survives, and they might actually be a force when most other film photography has vanished. |
The Nightmares BeginUnderwater photography is significantly different to terrestrial photography. To begin with, the underwater world is, and will always remain, a foreign environment to animals like ourselves. If you're not alert, you can go from happy to dead in a shockingly short period of time. Below the surface, the continued maintenance of things we normally take completely for granted, like the air we breathe, is a major technical hurdle. No-one is exempt - scuba divers face the dangers of the bends and nitrogen narcosis, but even snorkellers can suffer from the little known condition called "shallow water blackout", which is much more likely to hit a camera-equipped snorkeller than other snorkellers, since photographers are more likely to over-exert themselves and so run out of oxygen. Apart from these entirely man-made dangers, you also need to remember that this is a dogfish eat dogfish world, and a surprising number of creatures here are protected by poison, including the coral reef itself, not to mention crinoids and beguilingly attractive critters like cone shells, which are small and very beautiful but have enough punch to kill anyone ignorant enough to pick them up. The rule, then is this - don't touch! If you don't touch anything, then you won't harm it and it won't harm you. In addition to these potentially lethal problems, there are other matters which are merely troublesome rather than a matter of life and death. In particular, this is a far more three dimensional environment than the one we're used to, where our feet are normally planted firmly on the ground. Moving up and down within the water column takes a lot more effort than we expend in our normal two-dimensional lives, and for photographers the techniques required to maintain a motionless position long enough to get photos can be surprisingly tricky. Scuba divers wearing buoyant wetsuits also need to wear heavy weight belts, and they have to use buoyancy compensation devices (BCDs), which are inflatable and deflatable jackets which can be used to fine-tune whether they float or sink. I've never scuba dived, but when I'm snorkelling I also wear a weight belt in order to achieve neutral buoyancy. Since the pressure at different depths compresses the air in my lungs to different amounts, I actually float when I'm near the surface, and sink when I'm 25 or 30 feet below the surface. Another aspect of photographing in a three-dimensional environment is learning which camera angles work and which don't. It shouldn't be too much of a surprise that photographs of retreating fish are unattractive but so, often, are photographs of fish taken from above. It's much more likely that a fish photographed from below will result in a good shot. |
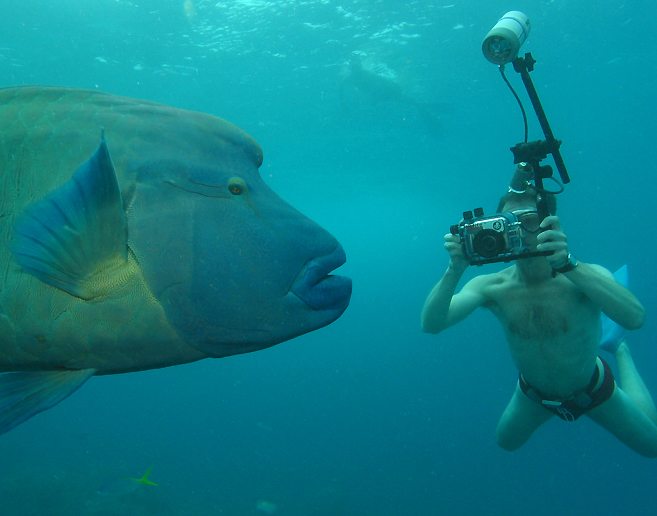
Assuming that you've come to terms, at least theoretically, with the notion of being a non-fish in water, the greatest issue you'll then have to deal with is the selective absorption of light by water. As you go underwater, red light starts to get filtered out at about the 10 foot level, and then orange, yellow, green and by the time you're at 100 feet there's only blue left. The result of this is that photographs taken in even very shallow water come out very blue. This isn't at all apparent when you're underwater, because the human brain does a good job of deciding what things "should" look like, and so it compensates for the excess blue! Only when you see your photos will you realize how little color survives underwater. This photo illustrates a few of the points I've made so far. Here I am photographing a Napoleon Wrasse on the Great Barrier Reef using a Canon G2 digital point and shoot camera in an Ikelite housing and with an Ikelite flash. The guy photographing me is using the very same camera and housing, but he has a wide-angle converter on the lens to allow him to get closer to the fish and me, and he also has a more powerful Ikelite flash unit than I have. Despite these two advantages, and the fact that we're in relatively shallow water on a very sunny day, the colors in this photo are not natural. The swim suit I was wearing was bright red, but it appears almost black even though I've used PhotoShop's "adjust color balance" feature to tone down the blue and intensify the yellow and red. Scuba divers who cut themselves underwater experience a similar unnerving sensation - their blood appears to be black because all of the red light has been absorbed! Incidentally, in this photo you can also see the weight belt I wear when snorkelling underwater to give me neutral buoyancy. There are two solutions to the light absorption conundrum: restrict all of your photography to sunny days and the top ten feet of water, or use a powerful flash to restore the light and color. If your camera doesn't have a flash, then you've got no choice except to take the first piece of advice; otherwise, you need to use an external flash, which underwater photographers most often refer to as a "strobe". Even an external flash isn't a cure-all solution. Water not only selectively absorbs light, it absorbs light, period. As you can see from this photo, even the most powerful strobe has a range of only around 10 feet, far less than a flash used in air. Another serious problem with using strobes is called "backscatter". It's extremely rare to have truly crystal clear water; instead, there are a large number of suspended particles present even in water which seems totally pure, another example of the human brain filtering out things which it doesn't consider important. These particles often aren't a problem if you're doing available light photography, but as soon as you start using a strobe it becomes a much more serious issue. If you don't think you'll be using a strobe much, then you better go back a couple of paragraphs and read again what I said about light absorption! The best way to think about backscatter is to imagine the particles as small spheres made of shiny, silvery metal. When the light from the strobe hits these spheres, the light is reflected back towards the camera, resulting in a photograph that looks like it might have been taken in an underwater snowstorm! There are two main solutions to this problem: shoot your subjects from close up so there are fewer particles between you and them, and move the strobe onto an arm which is a significant distance from the camera itself - doing this will reduce the area of the particles which is strongly lit, resulting in less backscatter. You can see a typical strobe arm in the photo above. The other piece of advice, about shooting from close up, also fits in well with the short range of all underwater strobes. |
|
The single biggest nightmare haunting all underwater photographers centers around o-rings. These are donut-shaped rubber rings which are placed at every point at which water could enter the camera, or the housing. The largest and most vulnerable o-ring is at the back, where the film door opens on a dedicated underwater camera, or where a non-dedicated camera is placed into a housing. Regardless of how careful you are, there comes a time when you look at your camera and see water where it shouldn't be. I've had it happen three times with Nikonos V cameras: the first time in the Solomon Islands and the second time in Tobago it was, and remains, a mystery to me why it happened, but the third time it happened, in Okinawa, it was totally my fault: I forgot to fit the lens o-ring into the camera! I'd kept all of the main o-rings stored off-camera because I was afraid that having them always on-camera was damaging them and causing the flooding! There are two schools of thought where o-rings are concerned: one group of people says you should always remove, clean and regrease the main o-ring every time the back door is opened, for instance, whenever you load a fresh battery; the other group says you can open and close the door multiple times without regreasing the o-ring, but if you see any grit or other evidence of problems then you should clean and regrease it. For some years I belonged to the first, ultra-careful camp, but after speaking with various underwater photographers and reading articles on the internet, I became convinced that the two approaches result in pretty much identical odds of disaster, so I opted to take the more convenient approach of only cleaning the o-rings after I could see, or thought that there might be, grit around the seal. Macro PhotographyIf you're determined to master the field of underwater telephoto photography then you'll have a uniquely lonely road to tread, one without fellow travelers and without any equipment, either. In short, there's no such field, because of the problems of light absorption and backscatter which have already been discussed. There is, however, a considerable field devoted to wide angle photography, which is particularly suited to underwater work, because wide-angle lenses have great depth of field and allow very close focusing. When combined, these two features allow you to place a large foreground item in the frame at a very small distance from the camera while making items in the middle distance appear to be quite far away - resulting in a shot which exaggerates the clarity of the water, which is a nearly magical feat of great value in this type of photography! Another area of underwater photography which maximizes the advantages of short camera-to-subject distances is macro photography. Again, backscatter is minimized and the short distances allow small apertures to be used. Whether above water or below, macro photography turns small critters which might be easily ignored into fascinating explorations of a miniature world whose shapes, patterns and colors often exceed the beauty of the larger worlds around it. Something else to consider is that the refraction of light through water means that any lens which is taken underwater will have a focal length multiplication effect applied to it - an underwater lens with focal length of 35mm will have about the same angle of coverage as a 50mm lens above water. This is a true focal length multiplication effect, completely unrelated to the "field of view crop" experienced by digital cameras whose CCD or CMOS sensor is smaller than the size of a 35mm film frame. If you do take such a camera underwater, then not only will you get the focal length multiplication caused by refraction, you'll also get the field of view crop, turning a 35mm terrestrial lens into an 80mm equivalent lens underwater, assuming that you're using a camera like the Canon D60 which has a 1.6 times field of view crop factor. |